Prom Album
On a special night not long ago, I went to the prom with my favorite beau.
With him in his tux and me in my gown,
we rode in a limo to the far side of town
We ate and danced for a very long time, but it seemed just like minutes when we heard the clock chime
It was not a dream, yet it seemed to be so, we had so much fun with people we know.
With memories in tow, we captured it all, come see our adventure, with pictures to show!
Please note: The stencil used in this example project is no longer available, so we have listed an alternative stencil pack for you instead. The Designer Series wedding stencil kit comes with both a tux and a gown design. The kit includes adhesive backed bow ties and rhinestones for added bling. Also, the Hats stencil not only has a formal Top Hat design, it also comes with a Mortar board for graduation. These stencils are re-usable and there is more than enough bling to make both a Prom and a Graduation album and then some!
Materials
- #15-0200 Armour Etch Glass Etching Cream
- #12-9701 Wedding Celebration Kit
- #21-1654 Over N Over stencil-Hats
- #28-6523 4x5.5 inch Oval mirror
- Dazzle Tac Glue
- 8.5 x 11 Black 3 ring binder w/ photo page inserts
- Gold Vinyl scroll stickers for scrapbooking
- 1 inch Gold vinyl alphabet stickers
- Gold foil heavy card stock
- Pencil
- Ruler
- Toothpick
- Scrap piece aluminum foil or glue tray
Additional Materials
Directions
Preparation and Usage Starting Skills
Project Steps
- Clean mirror with glass cleaner
- Apply the top hat stencil to the upper part of the mirror. Place the tuxedo stencil directly underneath it, overlapping edges top and bottom.
- Cover the face of the mirror with masking tape, overlapping all edges and onto the stencil.
- Put on the gloves. Pat the Etch Cream on the stencil (do not brush it on like you are painting) until it is about one fourth inch thick. View the directions and How to Videos.
- Leave the cream on for 5 minutes. Rinse under running water until all visible cream is gone. Remove the stencil and tape and rinse the mirror again until no cream residue remains.
- Pat stencils dry and return to the carrier sheet.
Assemble Album:
- Turn your gold foil cardstock to the backside.Trace around the outside of the mirror, leaving enough space to enlarge the oval by one half inch.
- Using a ruler, mark a pencil line one half inch around the outside of your traced oval. Connect the dots to form a larger oval. Cut the oval out with scissors on the outer line.
- Turn the gold oval over to the front side. Gently burnish down the raw edge with your finger or a piece of smooth PC paper, paper bag or burnisher.
- Apply dots of Dazzle Tac glue to the backside of the mirror. Center the mirror over the foil oval and join the two together. Check that the rim of gold showing is even on all sides. Set aside to dry.
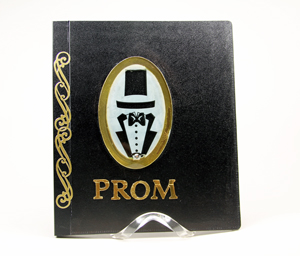
- Once the mirror assembly is set up enough to handle, apply some dots of glue to the backside of the cardstock side and mount the mirror assembly to the cover of the album as shown in the picture.
- Apply the rhinestones and/or bowtie to the design. Adjust to position with a toothpick (for better durability, use one end of a toothpick and apply a tiny dot of Dazzle Tac glue to each spot you will be applying a rhinestone or bowtie)
- Apply vinyl scroll down left side of album cover.
- Apply PROM letters under the mirror
Article Posted: 03/07/2017 01:04:58 PM
 Prom Album
Keep those fond memories of your years in school
Prom Album
Keep those fond memories of your years in school


